GroveStreams Raspberry Pi - MQTT Tutorial Extras (Beta)
 (Optional)
 (Optional)
This is a continuation of the GroveStreams Raspberry Pi - MQTT Tutorial. It covers these more advanced topics:
- Viewing, building and debugging the Pi's GroveStreams' code
- Configuring the Pi's settings from GroveStreams
- Creating a GroveStreams component template
- Detecting Expiring X.509 certificates
- Rolling X.509 expired certificates
- Updating the Pi's GroveStreams public certificate remotely
- Certificates in Production
- Downloading and reinstalling the service from GroveStreams
- Configuring an Event Action Package that makes MQTT Publishes
- Restarting the RaspberryPi remotely
- Using Request-Response pattern
- Using MQTT to make GroveStreams classic HTTP API calls
- Using MQTT Last Will and Testament (LWT) to set device status in GroveStreams
- MQTT auto-reconnect
- MQTT client caching while communications are down
- Compression, Logging (Log4j and slf4j)
- Determining data I/O
Viewing, building and debugging the Pi's GroveStreams' code
The GS Pi tutorial is built using Eclipse with Maven. The source code can be found in GitHub here: https://github.com/GroveStreams/api-examples/tree/master/mqtt/gs_pi_javaPull the GS MQTT gs_pi_java Project from GitHub into Eclipse:
1. Copy this GitHub URL of the repository to the clipboard: https://github.com/GroveStreams/api-examples
2. Open Eclipse and choose Import –> Projects from Git (with smart import)
3. Choose the Clone URI option in the Git import wizard and click Next
4. Confirm the URI, Host and Repository path parameters and click Next (the fields should be auto-populated from the clipboard)
5. Choose the Git branches to clone from the remote repository and click Next
6. Confirm the Directory into which the repository will be cloned and click Next
7. Choose the Maven project api-examples/mqtt/gs_pi_java to import into Eclipse from GitHub and click Finish
The gs_pi_java project should appear on the left under Project Explorer. Click the square Restore icon on the left toolbar if you don't see the Project Explorer tab.
Building and Debugging:
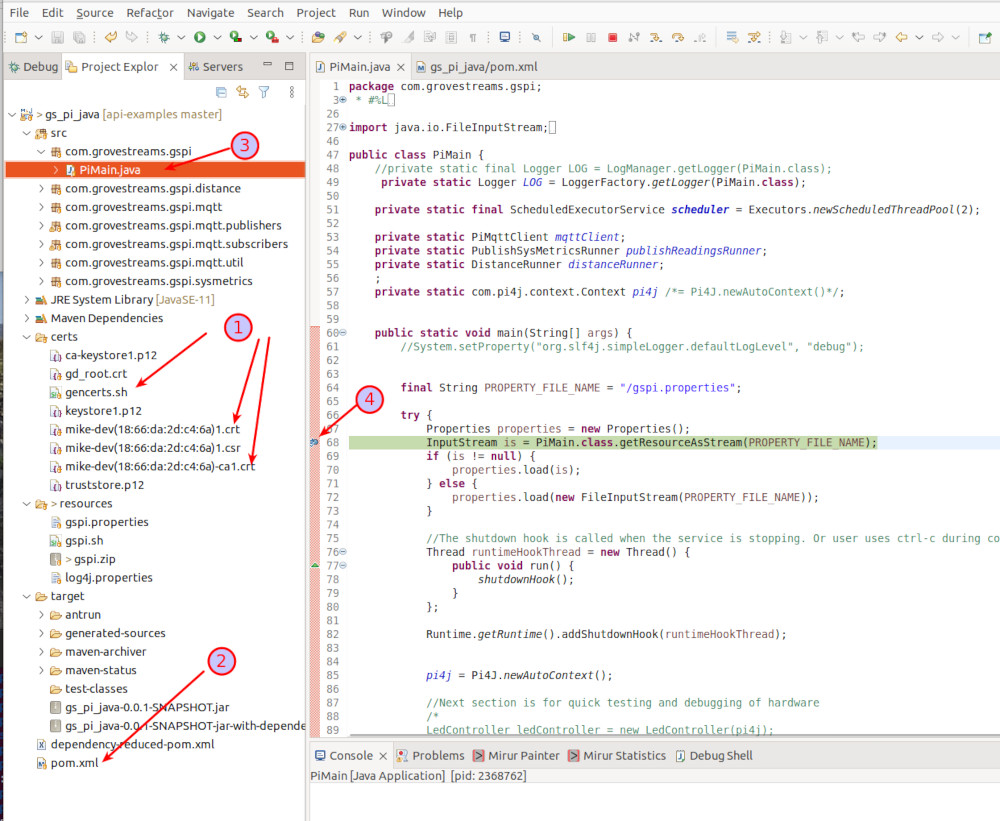
1. Right-click on certs/gencerts.sh and select Run As - Bash script to generate the X.509 certificates. Right click on the certs folder and select Refresh. Import the two new generated .crt files into your GS organization.
2. Right-click on the pom.xml and choose Run As - Maven Install
- The build (the Maven pom.xml file) will build the jar file and copy all files needed to run the service to a higher directory: See the console window during the Maven build for the directory.
- The build will zip the above directory with the name gspi.zip and copy back into the project's resources directory. This is the gspi installation file.
- The project and build are designed so gspi can be started and run outside of eclipse from the higher/independent directory or from within the eclipse debugger.
4. Double-click to the left of a line to set a debug breakpoint
5. Right-click PiMain.java and select Debug As - Java Application. The function main(..) in PiMain.java is the first method called when gspi is running.
Configuring the Pi's Settings from GroveStreams
Storing sensor configuration data can be accomplished by storing the settings in the Pi's component streams. The following Pi settings will be fetched from the Pi's GroveStreams component streams during startup, if they exist and have values:- sysMetricsRate: Pi metrics upload rate in seconds. Default: 60
- ledGreenStart: Green LED start amount. Default: 60
- ledGreenStop: Green LED stop amount. Default: 1000
- ledYellowStart: Yellow LED start amount. Default: 40
- ledYellowStop: Yellow LED stop amount. Default: 60
- ledRedStart: Red LED start amount. Default: -1
- ledRedStop: Red LED stop amount. Default: 40
Create the settings streams:
1. Right-click on the component and select Edit - Component
2. Right-click on Streams and select Add - Stream - Point Stream
3. Set the Name and ID to sysMetricsRate
4. Set the Data Type to integer
5. Set the Initial Value to 60
6. Set the Visuals tab. Check Has Chart minimum and Maximum and set the Maximum to 1000
7. Right-click the sysMetricsRate stream and select copy and make six copies, one for each LED setting
8. Do the following for each of the copies:
- Select a copied stream
- Change the name and ID to one of the LED settings (i.e. ledGreenStart)
- Set the Initial Value to the Defaults from above
10. You can, optionally, select General Properties and give the component a different name. Select Location to set the component's location on a map
11. Click the Save button at the bottom of the window
The Pi will use these new settings when it is restarted. Change any setting stream value and restart the Pi to apply them. Values can be changed by double-clicking the stream, setting a new value (with a time) and saving it. A dashboard with a Stream Form widget can also be created to change stream values.
Settings can be stored in regular streams, vs a point stream. Regular streams will keep a historical record of the settings as they change, but a regular stream does not have a default value. The default value would have to be stored in the Pi's properties file (as it is designed today).
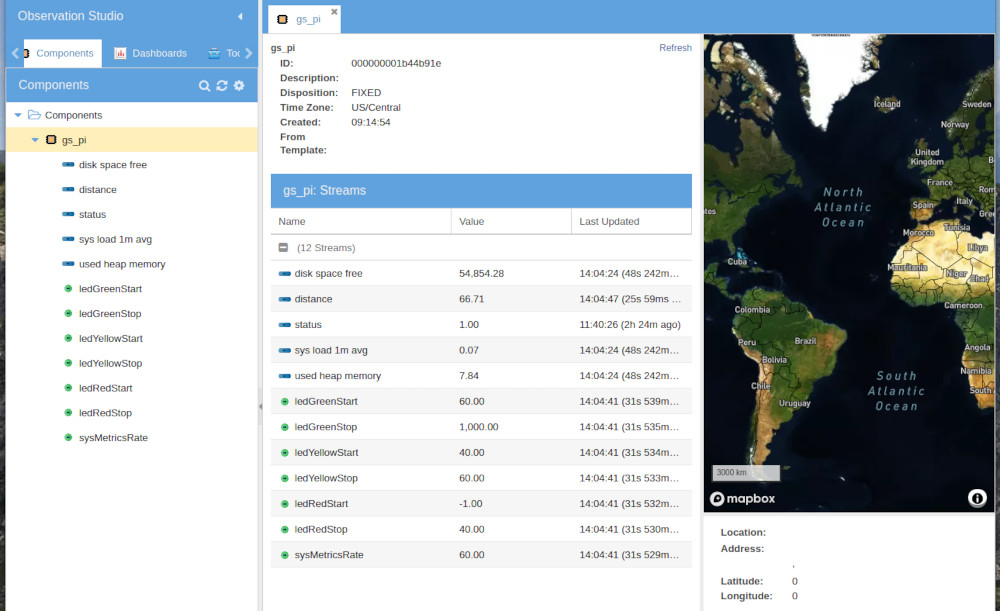
Double click the Pi component to view component details and stream last values. It should look something like this:
Creating a GroveStreams Component Template
GroveStreams will automatically create a component using the included Component ID (the {compId} part of the MQTT topic) as the component ID and possibly its name. GS will guess the stream data type based on the data being included in the first call. This is not ideal in the real world especially if there are thousands of components.This section describes how to create a component template and use that template for the creation of new components.
Creating the template:
1. There are two ways to create a template:
- On the Tools tab, right-click Component Templates and select New - Component Template
- Right-click an existing component and select Create Template from Component. That's what we're going to do next...
3. On the Tools tab, Select Component Templates and click the Refresh button in the toolbar (under the Tools tab).
4. Right-click the gs_pi template and select Edit. Make these changes:
- Set the template ID to gspiTmpl
- Select the ledGreenStart stream and change its name to Green LED Start. Give the other streams readable names. Don't change the IDs because the Pi identifies the streams by their IDs.
- Select the sysMetricsRate. Click the Unit to setup a unit. In the Units selector window:
- Right-click on Units and select New - Unit. Set name to "Seconds". Set the symbol to "seconds". Set the number format to "0,000 ". Click Save
- Select the new Seconds unit. Do this for each LED setting stream.
- Select the distance stream. Give it a centimeters unit.
- Right click on the Events folder and select Add - Event - Value Condition Event
- Set Name to Proximity Alert
- Set Apply to Stream to the distance stream
- Set Start Trigger Action Package to Standard Start Action Package
- Set Stop Trigger Action Package to Standard Stop Action Package
- Set Validation Expression to value < 40 stream
- This event will execute the Start Action package when the distance is less than 40. It will execute the Stop Action Package when the value goes back up to 40 or higher. An Action Package can make an http call, do an MQTT Publish, send emails, send SMS.
- Events can be monitored on dashboard map widgets.
1. Test the template by deleting the existing Pi component and letting a new one be auto-created with the template. There are several ways to create the component from the template:
- Manually: Right-click the Components folder and select New - Component From Template, edit the component and set its ID to the ID of your Pi. This is a good way to test a template but should not be used in production as it does not scale well.
- Via Feed APIs: Both the HTTP API and the MQTT Feed APIs allow a template ID to be included in the Feed JSON. The template matching the ID will be used to create the component during the first Feed PUT/Publish call.
- Via the GS MQTT Certificate: Select the template to be used during the importing of the Device certificate. If the certificate has already been imported, double-click it to edit it and select the template that we just created: pi Template. Associating the template with the certificate avoids passing the template ID with every Feed Publish call and keeps data I/O costs lower.
Test the template with the Pi by deleting the gs_pi component (not the Template!!!) and wait for the next MQTT Feed Publish to arrive. Click the Component's Refresh icon until the new component is created and visible.
Edit the new component and ensure it matches the template. The component Name and ID should match what the Pi is passing up.
Template Summary:
The first MQTT Feed Publish the Pi makes is to set its status. This call will include a name for the new component. The name will only be used when the component is created. The ID {compId} will be used for the component name if one isn't included in the Publish JSON op section. Test this by stopping gspi on the Pi, deleting the GS Pi component, and then starting the gspi servic on the Pi.
Templates allow for the mass editing of many components. Edit a template and then right-click it and select Reconcile Linked Components to apply the changes to all component linked to it. This feature is only included with GS pricing plans that include Advanced Modeling.
Detecting Expiring X.509 certificates
1. Open the MQTT certificates window2. Right-click Certificate Operations and select New - Certificate Operation
3. Set Name to Certificates Expiring. Select Operation Type Report all certificates expiring
4. Select the Schedule & Email tab and configure the schedule and the email settings:
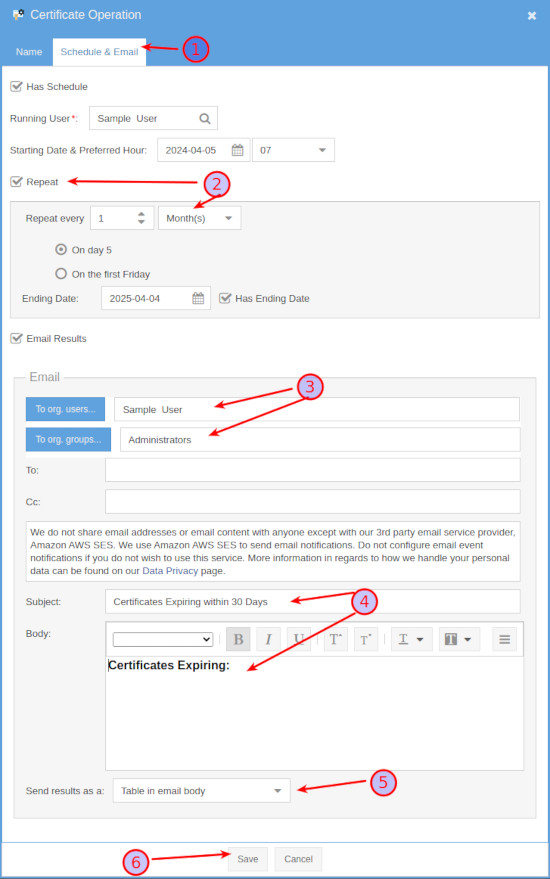
5. Save the certificate and test it by right-clicking on the operation and selecting Execute Certificate Operation Now. Monitor system notifications for success or failure of the operation.
How it works:
- A Certificate Operation will process every certificate under the selected folder on the Name tab, including certificates in every sub folder.
- Only device certificates are processed. No Certificate Authority (CA) certificates are processed.
- Only ACTIVE certificates are processed.
- Only certificates pinned to a valid component are processed.
- The validity period of the uploaded certificate is compared with the Op's Days until expire selection. An MQTT call to the device is not made.
- The results will be emailed in one of the selected formats:
- Table in email body
- CSV file attachment
- Zipped CSV attachment
- Exclude results
Rolling X.509 expired certificates
1. Follow the directions for Detecting Expiring X.509 certificates with these changes:- Set Operation Type to Roll all certificates expiring
- GroveStreams will make the following MQTT Publish call for every expiring certificate: {orgUid}/manage/cert/roll/cid/{compId} with the cid being the component's ID that is pinned to the certificate
- It is the responsibility of the device to subscribe to that topic and roll their own certificate
- The gspi code is subscribed to {orgUid}/manage/cert/roll/cid/{compId} and will do the following:
- Run the gencerts.sh script and generate a new CA, private key, and public key and put them in a new keystore. The Names include a version number.
- Do an MQTT Publish with the topic {orgUid}/manage/cert/register/cid/{compId} to register both new public keys with the GS organization
- The gspi will test the new certificates without disrupting its ongoing tasks:
- Test Failure: Stick with old stores, delete new certs and stores.
- Test Success: Switch to the new private and public stores and test them:
- Test Success: Tasks are suspended briefly while unregistering the old certs with GS and deleting the old key and trust stores and switching to the new keys.
- Test Failure: Stick with old stores, delete new certs in GS and locally.
- The gspi certificate rolling logic demonstrates how to perform many complicated tasks, but the generation and storage of the CA's on the Pi are not a secure method for production systems. See the section Certificates in Production to understand how a production system should be designed.
Updating the Pi's GroveStreams public certificate remotely
Every MQTT device needs the GroveStreams public certificate for Subscribing to GS topics. Devices need logic to update this certificate as it will eventually expire or become compromised and need replacing. Here's how to setup a Certificate Operation to perform this task:1. Follow the directions for Detecting Expiring X.509 certificates with these changes:
- Set Operation Type to Update Trust Stores
- GroveStreams will make the following MQTT Publish call to each device: {orgUid}/manage/cert/update_truststore/cid/{compId} with the cid being the component's ID that is pinned to the certificate. The MQTT message payload is the UTF_8 byte string of the GS public certificate.
- It is the responsibility of each device to subscribe to the update_truststore topic
- The gspi code subscribes to the update_truststore topic and will update its trustore with the certificate in the payload and reconnect its MQTT client
Certificates in Production
Least Secure Method for Testing or When Purchasing X.099 Certificates Cost too Much:The GroveStreams Raspberry Pi tutorial uses self-generated self-signed certificates with the signing certificate authority (CA) residing on the Pi. This is not a secure solution, but works well for a tutorial or a testing environment. Here are some other self-signed (free) certificate options:
- gspi/certsgencerts.sh: This is the script used by the tutorial. It demonstrates generating a CA and a device certificate. The CA resides on the Pi.
- gspi/certsSingleSelfSigned/gencerts.sh: This is a script included with the tutorial. It demonstrates how to generate a single certificate that is self-signed. Uncheck the is a certificate authority within the certificate after importing. It is both a CA and device certificate (leaf), but GS will assume it is a CA certificate until the "is CA" checkbox is unchecked. This method is very insecure, but keeps things very simple in a prototyping environment.
- gspi/gencacerts.sh and gendevicecert.sh: These scripts demonstrate how to generate a hierarchy of CAs and several device certs as part of a CA chain. Edit the scripts to fit your requirements. Don't store the CAs on the devices. Write the device cert rolling logic to work with updating the device certs only. A possible solution is to write your script that generates new certificates, using the CAs to sign them, and store them within a GS File Stream. The script would reside on a secure PC. Program the device to download the new certs from the file stream when a roll topic publish is made. Or, include the new certs as part of the next install and just have the Pi reinstall itself from a new provisioning file stored in a GS Component file stream.
More Secure Method for Production:
What is recommended for production systems, is to purchase a signing certificate from a root certificate authority (CA). This way chains security down to a trusted source. Store the CAs off of the device. Write scripts to create and sign your device certificates on a secure PC using the purchased CA and to store the new device certificates within GS Component file streams. Program the device to download the new certs from the file stream when a roll topic publish is made. Or, include the new certs as part of the next install and just have the Pi reinstall itself from a new provisioning file stored in a GS Component file stream. The tutorial demonstrates most of what would be required including registering/unregisering certs with GS, testing certificates, downloading a file from a file stream and provisioning it.
Downloading and reinstalling the service from GroveStreams
The tutorial Pi's provisioning logic requires that a new gspi.zip installation file reside in the a component with ID=installs and a stream ID=gspi. Create a component with that ID and with a file stream with ID set to gspi. Open the file stream and drag the new gspi.zip file onto the file stream.The Pi tutorial' gspi service performs the provisioning when the topic {orgUid}/manage/provision/cid/{compId} (where {compId} is the Pi's ID which is also used for the component's ID) is published.
Testing the Pi's Provisioning - Executing an MQTT Publish:
- Publishing via an Action Package and Certificate Operation:
- Right-click Event Action Packages and select New - Event Action Package
- Set Name to MQTT Provision Publish and click Add - MQTT Publish to add an Action to the Action Package
- Configure the Action:
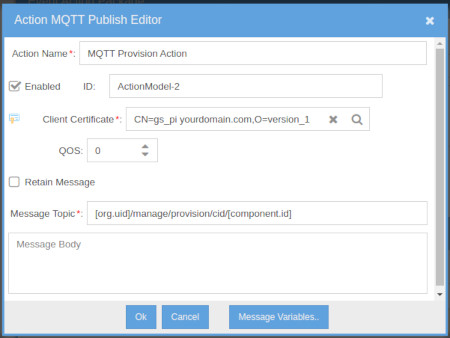
Save the Action and Action Package. - Create a new Certificate Operation, set its Operation Type to Take Action for all certificates and select your new MQTT Provision Publish Action Package
- This certificate operation will process all certificates under the selected folder and execute the Action Package substituting the certificate with the current certificate being operated on and substituting [org.uid] with the organization uid and [component.id] with the component's ID pinned to the cert being processed.
- Right click on the Certificate Operation to Execute it. It can also be scheduled.
- Publishing with the Organization Monitoring and Testing window:
MQTT Monitoring and testing can be done within Observation Studio: Choose Toolbar - Admin - MQTT Monitoring and Testing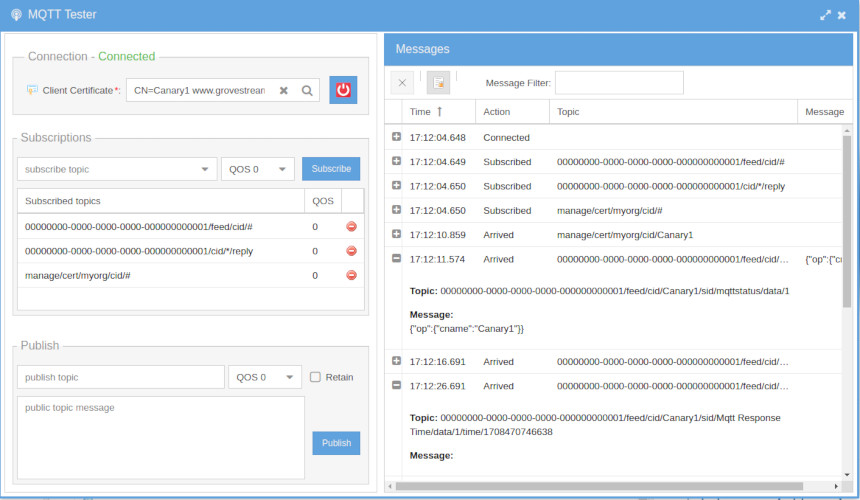
The tutorial's MqqtProvisioner.java file handles the provisioning. It:
- Uses an MQTT HTTP call, with ReplyTo logic, to download the new installation file. It downloads the latest file for the file stream.
- Unzips the downloaded file
- Restarts the gspi service
There's a flaw in this technique: What if it was a bad installation and the device cannot communicate with the server to get a new installation? Your device would have to be manually retrieved and manually reset. Not an ideal solution if there are thousands of devices in the field. A production system should be robust enough to handle this scenario. It should have a second service running on the device that is only responsible for installations. The install service could either subscribe to provision topics or ping the file stream intermittently looking for newer installations. The install service could also monitor the gspi service and restart it whenever it becomes unresponsive.
Configuring an Event Action Package that makes MQTT Publishes
See the section Testing the Pi's Provisioning - Executing an MQTT Publish within Downloading and reinstalling the service from GroveStreams above.Restarting the RaspberryPi remotely
The Pi's gspi service will restart itself when the topic {orgUid}/manage/restart/cid/{compId} is published (cid is the Pi's ID). The restart logic can be found within the tutorial's MqqtProvisioner.java file.To test the Pi's restart:
See the section Testing the Pi's Provisioning - Executing an MQTT Publish within Downloading and reinstalling the service from GroveStreams above. Use the topic: {orgUid}/manage/restart/cid/{compId}
Using Request-Response pattern
The tutorial relies on the MQTT Request-Response pattern to retrieve information from the GroveStreams servers.Some GS MQTT APIs support replies. GS requires that the message properties correlationData and responseTopic to be set to receive a reply (which is a publish from the GS MQTT servers using the responseTopic).
Optional Request-Response Message User Properties
- replyqos: The QoS of the response publish (0, 1, 2). Defaults to zero.
- replyenc: Compression encoding of the response message payload. Supported Encodings Here. The response payload is not compressed if missing or is blank.
- replyRetain: Whether to set the retain on the response message (true/false). Defaults to false.
Search the tutorial code for the class MqttReply to see examples of using the Request-Response pattern.
Using MQTT to make GroveStreams classic HTTP API calls
The GroveStreams MQTT API supports making GroveStreams HTTP API calls. Most of the GroveStreams HTTP API calls are supported.APIs:
- HTTP Feed API
- HTTP Advanced API
- The MQTT HTTP API: Describes how to make an HTTP API call
The MQTT HTTP API relies on the Request-Response pattern which is explained above. The Pi tutorial demonstrates the pattern in the MqttMySettings.getSettings() and MqqtProvisioner.downloadFile() methods.
Using MQTT Last Will and Testament (LWT) to set device status in GroveStreams
What's an LWT?- The publisher tells the broker to notify all subscribers to a topic, using the last will message, in the event that the connection breaks.
- If the broker detects a connection break it sends the last will message to all subscribers of that topic.
- If the client disconnects using the disconnect message then no last will message is sent.
The Pi tutorial uses LWT to set a value of one in the Component's status stream when the gspi connection breaks. The status is changed back to zero when a successful MQTT connection occurs.
An event could be configured on the Pi's GS component status stream to activate an action package which could then: send an SMS or email, execute an HTTP call, Publish and MQTT Topic. Active events can also be displayed on a dashboard widget map.
GS also supports stream latency events. These events are active when no samples have been added to a stream over a configured time span.
The certificate chain used during the creation of the LWT is stored and applied when the LWT is activated. The client must update the LWT when any part of the certificate chain has changed. The tutorial Pi updates the LWT during every startup.
MQTT auto-reconnect
Auto-reconnect is managed by the Eclipse Paho library with the setAutomaticReconnect(true) method on the connection options.MQTT client caching while communications are down
The tutorial Pi's client caching is managed by the Eclipse Paho library with the MqttDefaultFilePersistence class and a cache directory. Paho will cache all messages until delivered to the broker. This ensures data can still be gathered while disconnected from the broker.Compression, Logging (Log4j and slf4j)
GroveStreams MQTT was designed to allow for smaller data I/O. Compression of Feed MQTT message payloads is one feature that accomplishes this. The Pi's tutorial demonstrates compression. The Pi will only use compression if the compressed payload is smaller than the non-compressed payload. Supported Encodings HereThe tutorial demonstrates using Log4j and slf4j. This is mainly accomplished by the Maven pom.xml file and the decleration of the logging class at the top of each file:
private static final Logger LOG = LoggerFactory.getLogger(MqqtProvisioner.class);
Determining data I/O
Data I/O is the size of the message on the wire for MQTT transactions.Data I/O amounts can be viewed from within GS user accounts: Click your name on the top right and select Account:
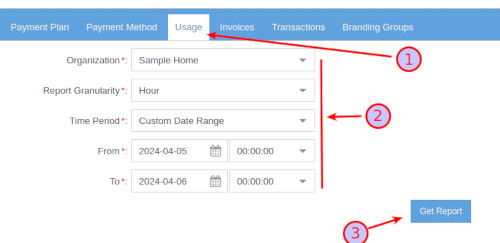
1. Select the Usage tab
2. Choose the report settings
3. Click Get Report
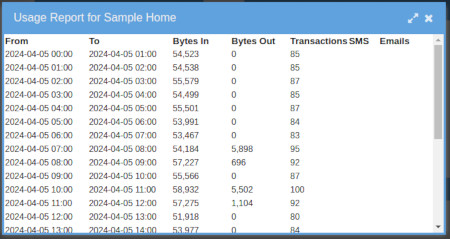
All I/O is considered. This includes when you leave a dashboard open with a fast polling rate. See this forum thread: What are billable transactions?
Measuring the Pi's Data I/O:
Let the Pi run without leaving any GS browser windows open. Then view your Account usage report for those hours for a good estimate of the Pi's data I/O for those hours.
Still having problems or you want to modify the solution and are not sure what to do?
Send us an email and we'll do our best to help you out: support@grovestreams.comHelpful Links
GroveStreams MQTTGroveStreams Help Center
GroveStreams HTTP Feed API
GroveStreams HTTP Advanced API
GroveStreams Forum
Raspberry Pi Forums
