GroveStreams Arduino Yún - Command Example
This tutorial takes off where the Arduino Yún - Quick Start tutorial ended. It describes how to send commands and configuration settings to the Yún from a GroveStreams dashboard through a local firewall.The command is an LED on/off command and the configuration setting is the sample frequency.
Two new data streams will be leveraged:
1. An LED stream
2. A Sample Frequency stream
The sketch provided with this tutorial works with the Arduino Yún, a temperature probe, and a resister with an LED light:
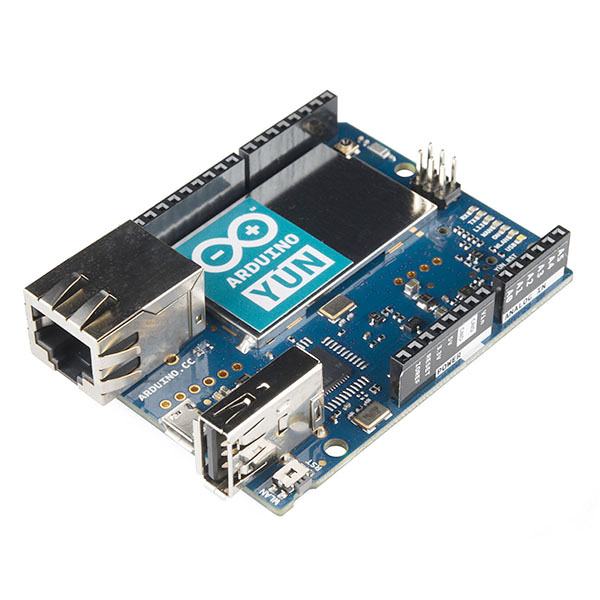
We used a micro USB to power the Yún from a desktop computer. We also used the Arduino 1.5.8 IDE which supports the Arduino Yún.
You can follow the Guide to the Arduino Yún to configure your Yún's WIF and security.
Follow the Arduino Blink guide to attach an LED to the Yún.
Step 1: Arduino - Quick Start Tutorial
This tutorial assumes you have performed the Arduino Yún - Quick Start tutorial. Enter your Arduino Quick Start Organization.Ensure you have an GroveStreams organization that contains the Arduino component with these streams:
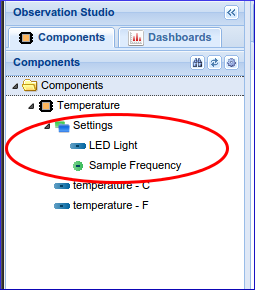
Don't see those streams? Then you performed the Quick Start tutorial before we updated our Arduino System blueprint. Restart the Quick Start tutorial with a new organization so that you have the correct artifacts within the organization and then continue below.
Step 2: Create the Arduino Sketch
Open the Arduino IDE (Integrated Development Environment) and create a new sketch. Copy the below into the new sketch:
How to Copy
Select all of the code below and copy it to the clipboard (Ctrl-c). Paste the code into the Arduino IDE sketch (Ctrl-v). Remove the first line "Data provided by Pastebin.com - Download Raw - See Original" from the Arduino IDE sketch.
Or
Click the Download Raw link below, select all of the code and copy it to the clipboard (Ctrl-c). Paste the code into the Arduino IDE sketch (Ctrl-v).
GroveStreams API Used in the Sketch Below
GroveStreams Simple Feed PUT API
Can't see the code below? It can also be found here: pastebin.com/DxGgEk7w.
Next you will need to edit the mac and gsApiKey sketch variables within the Local Network Settings and GroveStreams Settings section of the sketch:

1. Change the mac variable in your sketch. Newer Arduino Ethernet shields have a sticker with the MAC address on the back. Use that address. If there is no sticker, then a MAC address that is unique to your GroveStreams organization can be generated by clicking on the Tools button and selecting Generate MAC Address within your GroveStreams organization's Observation Studio.

1. Set the gsApiKey variable in your sketch to match your GroveStreams organization Secret API Key.
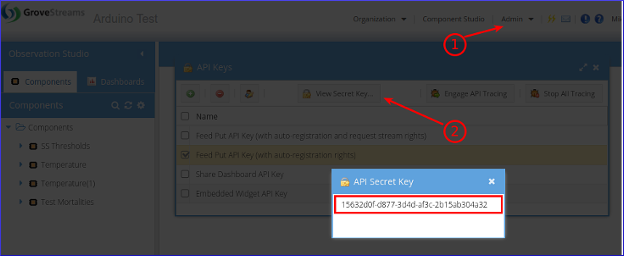
To find your Secret API Key:
1. Select the Admin - API Keys menu option and choose the Feed Put API Key (with auto-registration and request stream rights) key
2. Click View Secret Key
3. Select and copy the API Secret Key to the clipboard (Ctrl-c) and paste it into your sketch (Ctrl-v) replacing the existing gsApiKey value.
3. Click the Arduino IDE Serial Monitor button (The magnifying glass in the top right corner) to view debug tracing from the sketch.
!!!!!!!!!!!!!!!!!!!!!!!! Important !!!!!!!!!!!!!!!!!!!!!!!!
The API key required for this example requires the rights to return stream data (component/*/feed GET). A different API key is used above than for all other tutorials: Feed Put API Key (with auto-registration and request stream rights)
!!!!!!!!!!!!!!!!!!!!!!!! Important !!!!!!!!!!!!!!!!!!!!!!!!
The API key required for this example requires the rights to return stream data (component/*/feed GET). A different API key is used above than for all other tutorials: Feed Put API Key (with auto-registration and request stream rights)
!!!!!!!!!!!!!!!!!!!!!!!! Important !!!!!!!!!!!!!!!!!!!!!!!!
Step 3: Create the Control Dashboard
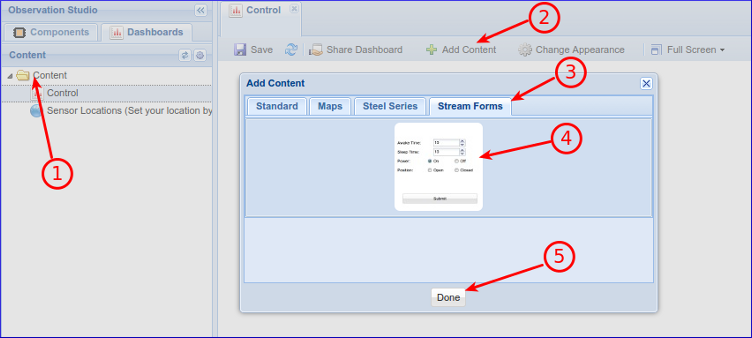
Within your GroveStreams organization:
1. Right click on the Content folder, select New-Dashboard, give your dashboard a name, and click OK.
2. Click the Add Content button.
3. Select the Stream Feed Forms button.
4. Click the Stream Feed Form Icon once.
5. Click Done
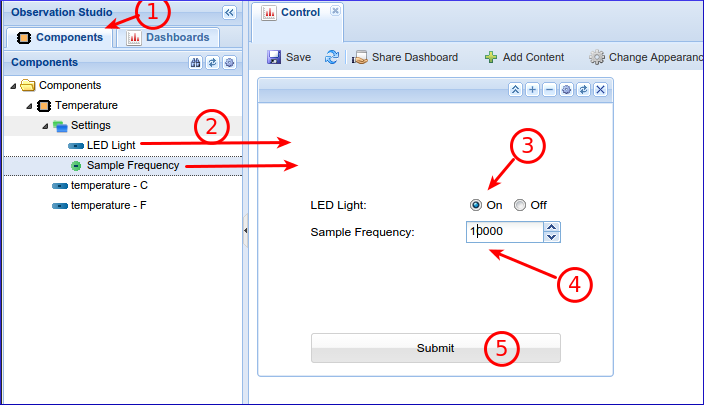
1. Select the Components tab.
2. Drag the LED Light and Sample Frequency streams onto the widget.
3. Select On for LED Light.
4. Enter 10000 for Sample Frequency.
5. Click Submit
Wait a few seconds (up to 20 seconds)...
The Yún's LED light will be on.
Congratulations! You have successfully created an Arduino Ethernet sketch that uploads measurements into GroveStreams and receives commands from a dashboard.
How it works
- A component template containing the component definition was created when you selected the Arduino blueprint. The template was used to create the component when the first feed arrived from the device. You can modify your component or the template by right clicking on them and selecting Edit.
- The component has two streams: LED Light and Sample Frequency. These streams will hold command and setting values that are used by the device. We chose a Regular stream type for the LED Light stream so that a historical record of commands is tracked. We chose a Point stream type for the Sample Frequency because we only want to store the last value.
- The Stream Feed Form on the dashboard will set both values when the Submit button is clicked.
- The URL used to upload the temperature readings within the arduino sketch includes two rsid parameters. rsid stands for Request Stream ID. The last_value of each stream, within the component the data is uploading into, will be returned.
- The Arduino code checks the return http body after each call for a JSON string that contains stream last_value amounts.
- The values are extracted from the JSON string using a 3rd party parser called ArduinoJSON - visit the ArduinoJSON Wiki for information about how to add their library to your sketch (it's very simple!).
- The LED and Sample Frequency values are then applied to the device within the sketch.
The technique to bring back commmands and setting values after each data upload, is not a real-time control framework, but it is very simple, keeps a record of commands & settings, reduces the number of transactions required, and will work through a local firewall without having to configure the firewall.
Helpful Links
GroveStreams Help CenterGroveStreams Simple Feed PUT API
GroveStreams Forum
Arduino Forum
