GroveStreams Particle.io Webhook - Quick Start
This tutorial walks through the creation of a user account, an organization, and a Particle.io Webhook that uploads voltage readings into GroveStreams every 20 seconds from a Particle.io Electron cellular board: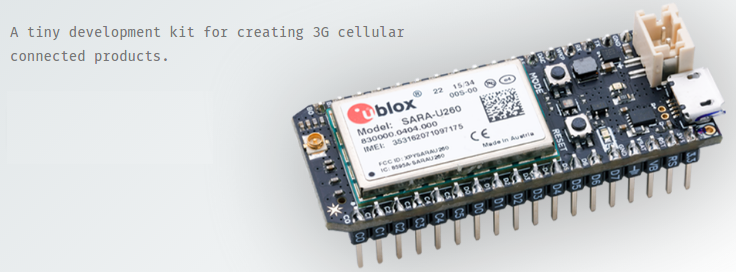
Step 1: Create a Free GroveStreams User Account and Organization
Open a browser and navigate to the GroveStreams registration page and sign up: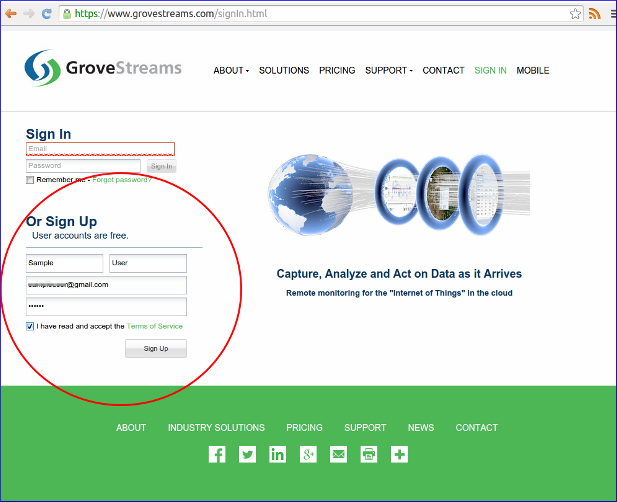
Log into GroveStreams after creating your free user account.
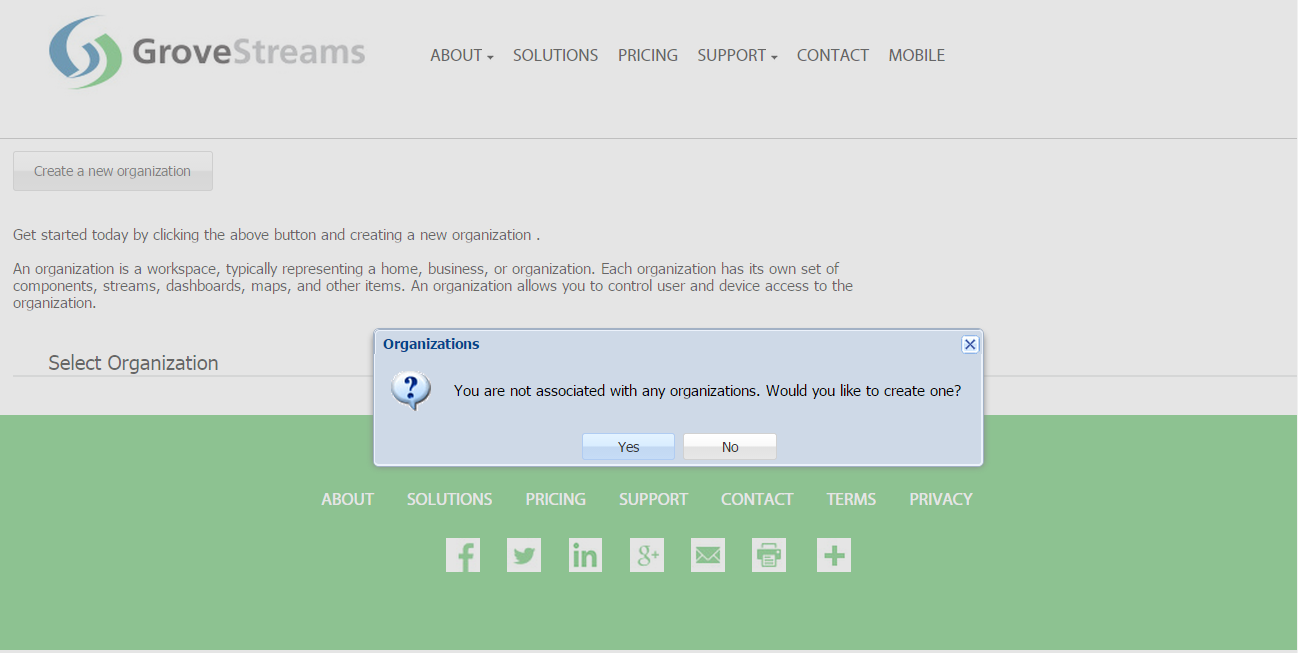
You will be prompted to create an organization. Select Yes:
What's an Organization?
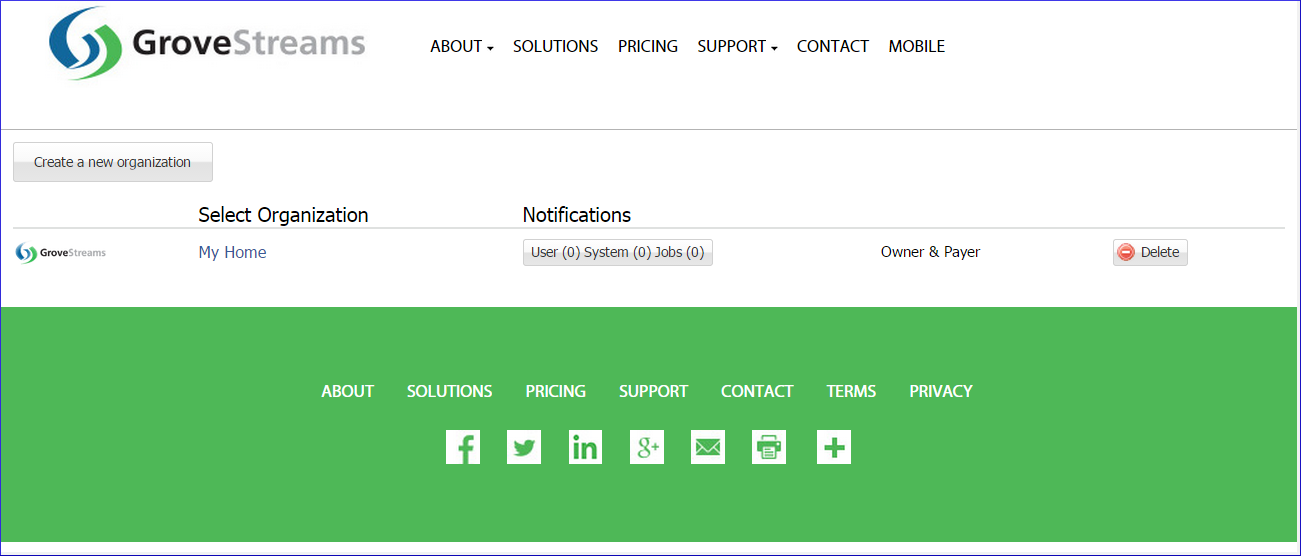
An organization is a Workspace, typically representing a home, business, or organization. Each organization has its own set of components, streams, dashboards, maps, and other items. An organization allows you to control user and device access to the organization. You are automatically the "owner" and given full access rights when you create an organization. Other users may invite you to their organizations with rights they give you. All of the organizations, you "own" or are a member of, will appear in your GroveStreams start page (the first page that appears when you sign in).
An organization is a Workspace, typically representing a home, business, or organization. Each organization has its own set of components, streams, dashboards, maps, and other items. An organization allows you to control user and device access to the organization. You are automatically the "owner" and given full access rights when you create an organization. Other users may invite you to their organizations with rights they give you. All of the organizations, you "own" or are a member of, will appear in your GroveStreams start page (the first page that appears when you sign in).
Enter a name for the new organization. It can be any name. Click Create Organization:
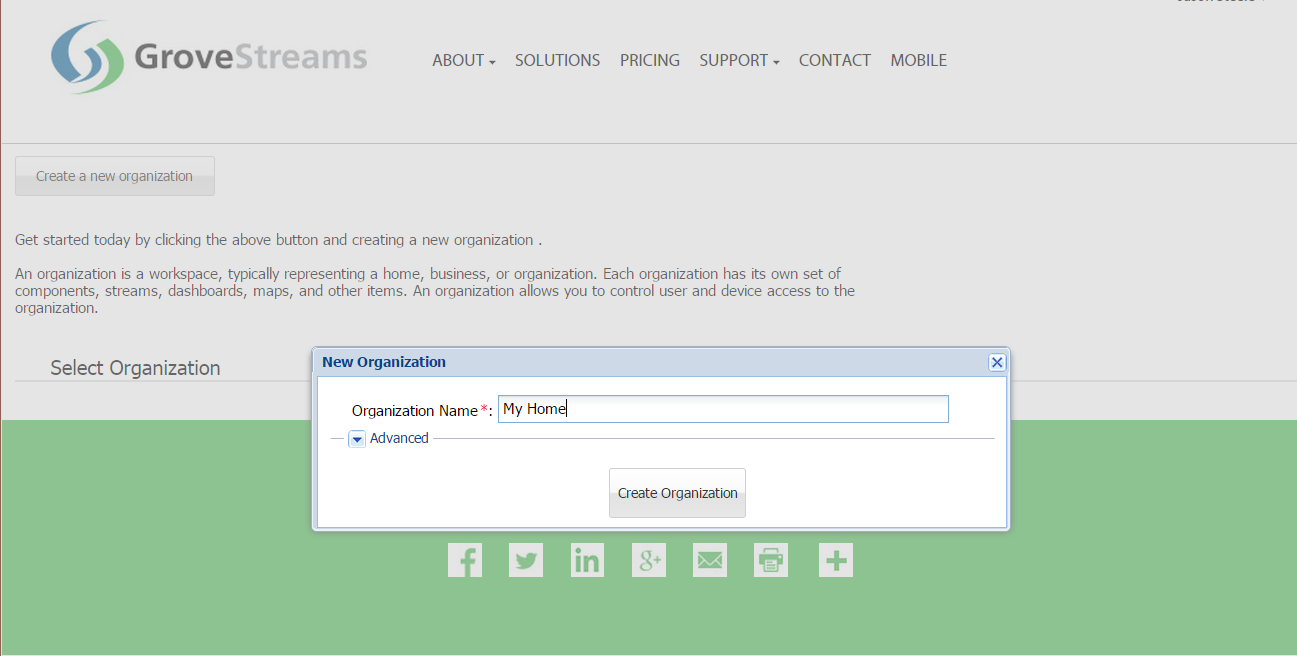
Enter your new organization by clicking on its name:
The API Key can now be retrieved. The API Key is needed later in the tutorial:
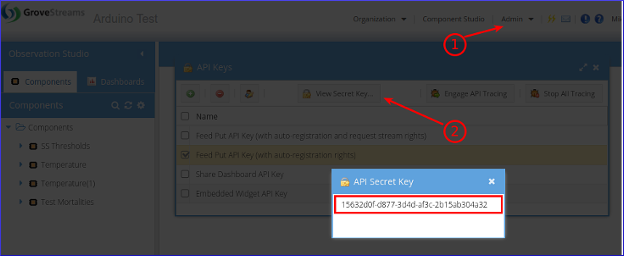
To find your Secret API Key:
1. Select the Admin - API Keys menu option and choose the Feed Put API Key (with auto-registration rights) key
2. Click View Secret Key
3. Select and copy the API Secret Key to the clipboard (Ctrl-c) when you are ready to paste it below.
Step 2: Program the Electron
Attach the antenna and the battery to your Particle.io Electron. Ensure the board has power and the green light is eventually lit.Open the Particle Build web platform and program your Electron with the following code:
How to Copy
Select all of the code below and copy it to the clipboard (Ctrl-c). Click in the box above and paste the code (Ctrl-v). Remove the first line "Data provided by Pastebin.com - Download Raw - See Original" from the top of the editor.
Or
Click the Download Raw link below, select all of the code and copy it to the clipboard (Ctrl-c). Click in the box above and paste the code (Ctrl-v).
(Can't see the code below? It can also be found here: pastebin.com/1iKLsfpw)
Select all of the code below and copy it to the clipboard (Ctrl-c). Click in the box above and paste the code (Ctrl-v). Remove the first line "Data provided by Pastebin.com - Download Raw - See Original" from the top of the editor.
Or
Click the Download Raw link below, select all of the code and copy it to the clipboard (Ctrl-c). Click in the box above and paste the code (Ctrl-v).
Step 3: Create the Particle.io Webhook
Navigate to Particle's webhook page: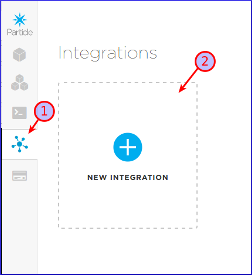
1. Select Integrations
2. Click New Integration
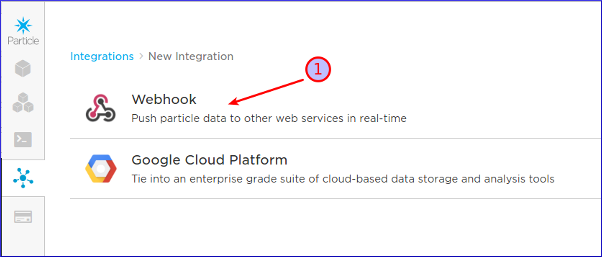
1. Select WebHook
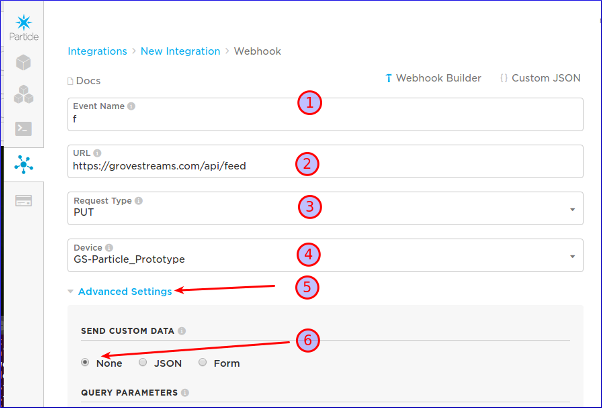
1. Enter the Event Name. It must match the name passed from the Electron code above: Spark.publish("f", voltageBuf, 60, PRIVATE). Use a short name since this is a cellular board and billed amounts are by bytes passed. Our event name is: f
2. Enter the URL: https://grovestreams.com/api/feed
3. Select the Request Type: PUT
4. Select your Device
5. Expand Advanced Settings
6. Set Send Custom Data to: None
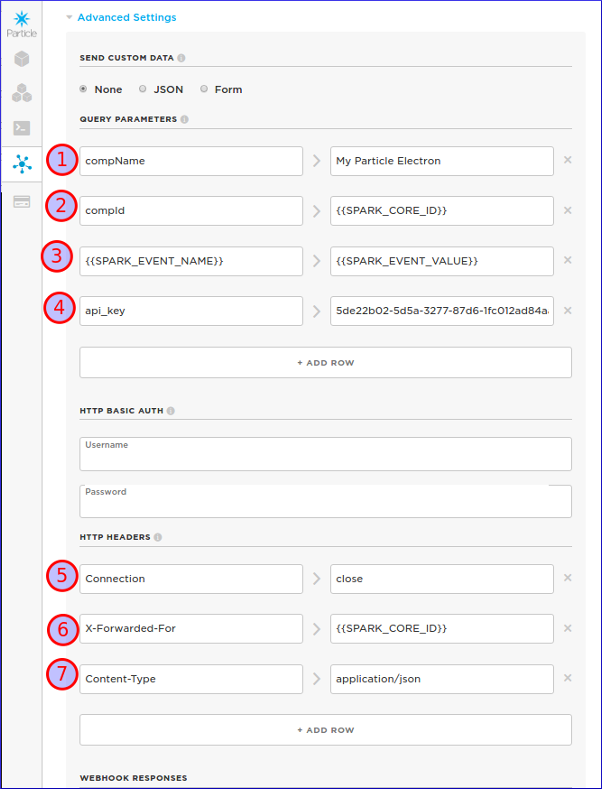
Add four URL Query Parameters:
1. compName > My Particle Electron
2. compId > {{SPARK_CORE_ID}}
3. {{SPARK_EVENT_NAME}} > {{SPARK_EVENT_VALUE}}
4. api_key > YOUR_API_KEY_HERE (Replace YOUR_API_KEY_HERE with the api key you copied above)
Add three HTTP Headers:
5. Connection > close
6. X-Forwarded-For > {{SPARK_CORE_ID}}
7. Content-Type > application/json
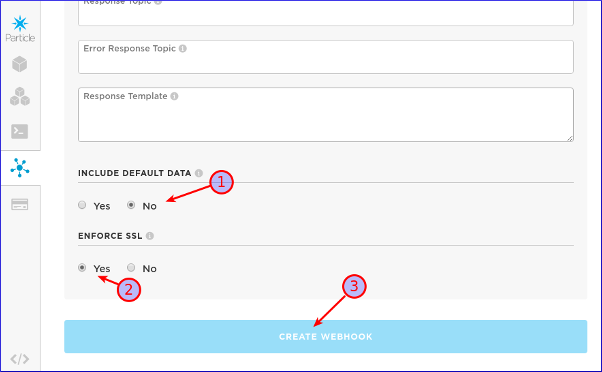
1. Set Defualt attributes: No
2. Set Enforce SSL: Yes
3. Click Create Webhook to create your webhook
Congratulations! You have successfully created a Particle.io Webhook that pushes measurements into GroveStreams.
Your data will arrive within 20 seconds as a data stream under a newly created component in Observation Studio:
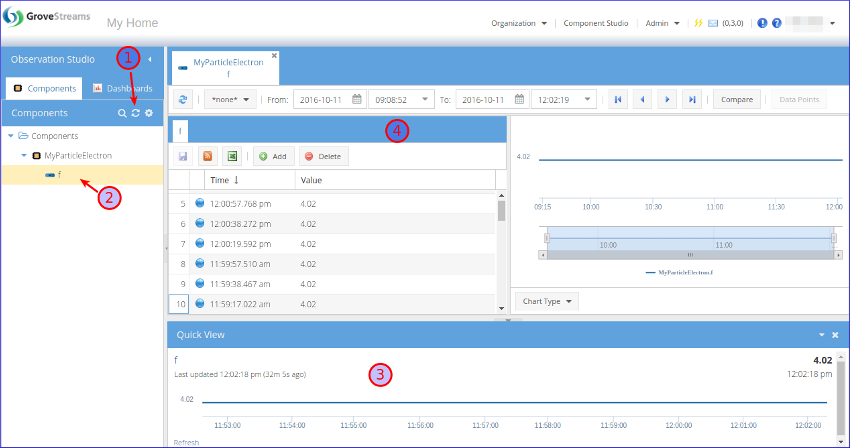
1. Select the Components folder and click Refresh to see the newly registered component.
2. Select the stream to view its latest samples within the Quick Viewer (3).
4. Double click the stream to open the stream in the Stream Viewer.
Click on the Dashboards tab to create dashboards and maps. Right click on the component and choose Edit Component to set your component's location, add stream units, create events with notifications, and change other properties. Keep exploring and learning!
Continue with the GroveStreams Temperature Example to learn more about how to make the most of your data with GroveStreams.
How it Works
The Particle.io Cloud pushes data to GroveStreams as it arrives via the Webhook. The webhook was configured to push the data to GroveStreams using the Feed PUT All on the URL API.Query Parameters:
- compName: This parameter is optional. It is the name of the newly registered component
- compId: This is the ID of the GroveStreams component to place the data into. It must be unique within the GroveStreams organization. A corresponding GroveStreams component and stream with the same ID will be created if one does not exist. The webhook is setting the ID to the ID of the Spark device.
- {{SPARK_EVENT_NAME}}: This is the ID of the component stream to place the data into. It must be unique within the component. The webhook is using the name of the event for the name of the stream. {{SPARK_EVENT_VALUE}} is the value to upload into the stream.
- api_key: This is your secret API key. It tells GroveStreams which organization the data will be inserted into and ensures the caller has the proper rights to make the call
- Connection: This tells GroveStreams to close the HTTP connection between calls
- X-Forwarded-For: This header prevents GroveStreams from blocking calls from the Particle servers that are made within 10 seconds per IP address
- Content-Type: Tells GroveStreams what type of data is arriving
This example was made simple by allowing GroveStreams to create a default component with a default stream. GroveStreams will do its best to determine if the stream type is a number, text, or boolean based on the first sample arriving. Users can view or modify existing component definitions by right clicking on them and selecting Edit Component. Modify any component attributes except the component and stream IDs. Consider using component templates to avoid having to edit every component after it registers.
Troubleshooting
Refresh the Particle.io Webhook Integrations page to view log entries of calls made to the GroveStreams platform. Click on an item to look for issues:
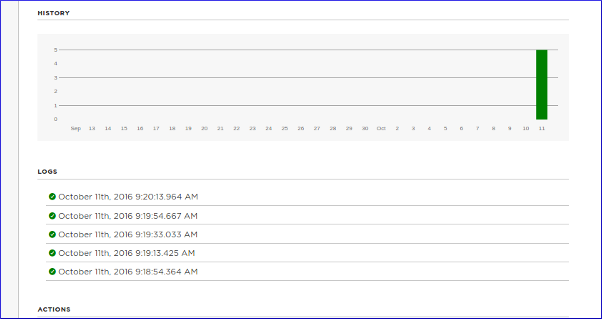
Successful API calls to GroveStreams should return a status of: HTTP/1.1 200 OK.
If the call made it to a GroveStreams server, but an error still occurred, a GroveStreams system notification will be created that contains the error. While in the GroveStreams organization's Observation Studio, click on the Notifications button located in the top toolbar (It looks like an envelope) and select the System tab. Click Refresh to list new notifications.
Ensure you are not using the same API Secret Key for different organizations. API Secret Keys are only associated with the organization they have been created within and can only be used for that organization.
Having problems or you wish to modify the solution and are not sure what to do?
Post a question on our forum or send us an email and we'll do our best to help you out: support@grovestreams.comHelpful Links
GroveStreams Temperature ExampleGroveStreams Help Center
GroveStreams Simple Feed PUT API
GroveStreams Forum
Particle.io Device Code Editor
Particle.io Webhook Integrations Editor
Particle.io Webhook Guide
Particle.io Community
