GroveStreams Java - Component Templates
Templates allow you to auto-register components as they come online.This tutorial will walk you through creating a component template with two streams, each associated with a rollup calendar. It will walk you through creating a feeder which will auto-create a component from the template and feed random stream data to your organization in GroveStreams. It also demonstrates the capability to compress feed data. It uses the advanced Feed PUT batch API which involves passing JSON to GroveStreams.
This tutorial assumes you've done the Hello World - Java tutorial and created a user account, an organization and an API key.
Basic knowledge of the Java programming language is required.
Step 1: Select the Tools tab
Step 2: Create Cycles and a Rollup Calendar
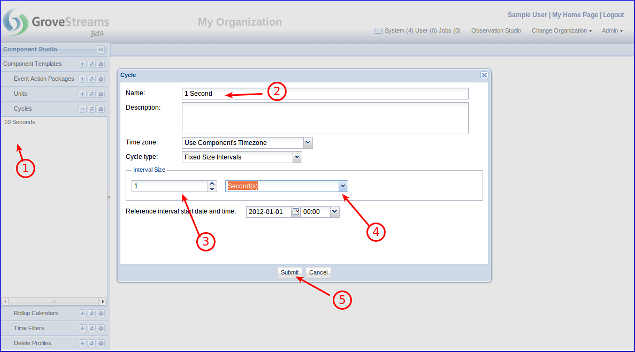
1. Right click in the cycles panel and choose New Cycle
2. Name the cycle "1 Second". It can be any name, but let's set it to "1 Second"
3. Leave the interval size as 1
4. Set the interval size type to Seconds
5. Click Save to save the new cycle
This cycle will be used as the base cycle for your streams. It tells GroveStreams to expect a 1 second sample rate from the feeder. It will also be used in the definition of the rollup calendar.
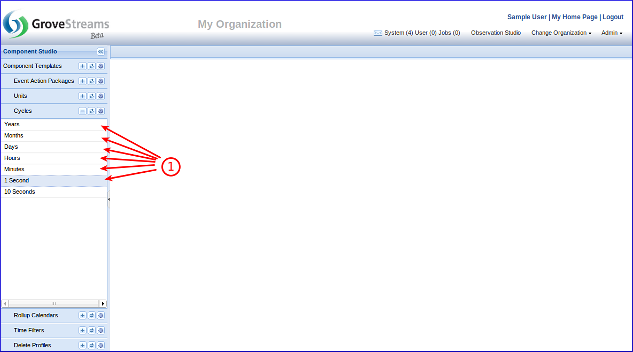
1. Create five more cycles similar to the 1 Second cycle:
- Minutes: 1 Minute
- Hours: 1 Hour
- Days: 1 Day
- Months: 1 Month
- Years: 1 Year
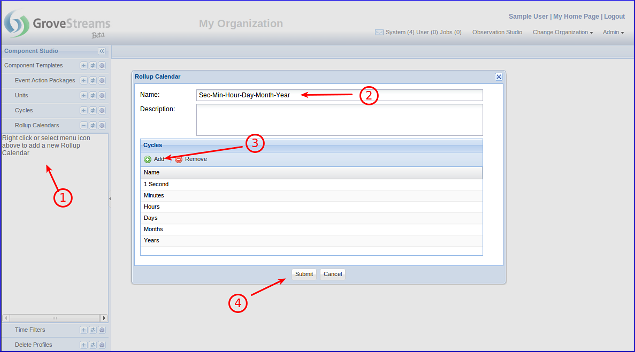
1. Right click in the Rollup Calendar panel and select New Rollup Calendar
2. Give the new Rollup Calendar a name. It can be any name.
3. Add the cycles we just created (as seen in the list above) in any order. The server will properly sort and validate that each of these streams are compatible for rollups and that there are no gaps between rollups
4. Click Save to save the new Rollup Calendar
Step 3: Create a Component Template
Select the Tools folder in the left panel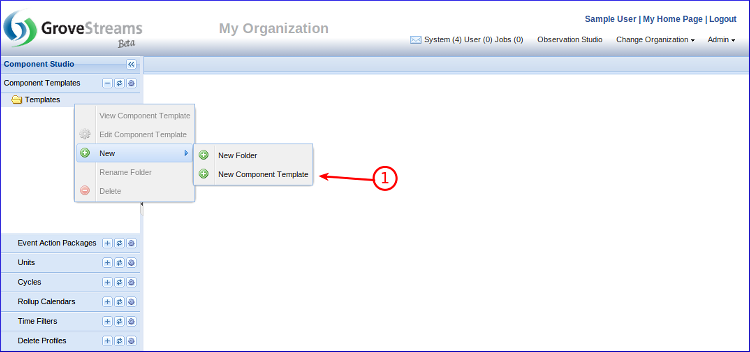
1. Right click on the Component Templates folder and choose New - New Component Template
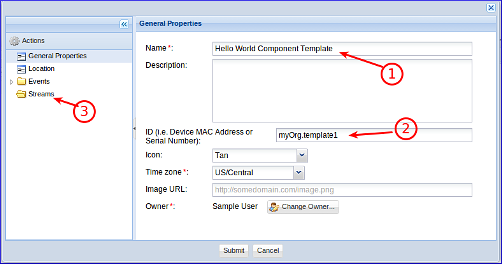
1. Name your component template. It can be any name
2. Set the ID to "myOrg.template1". This ID will be used in the feeder code below to match the device's feeds to this component. It can be any ID but it must match the template_id variable in the code below.
3. Right click on Streams and create a new Interval Stream
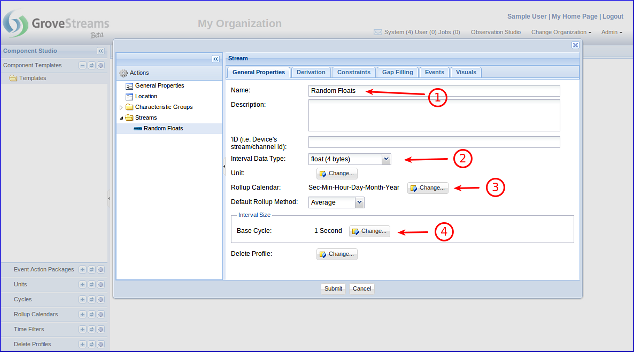
1. Name your stream. It an be any name
2. Set Data Type to float
3. Select the rollup calendar we created above
4. Select 1 Second as the base cycle
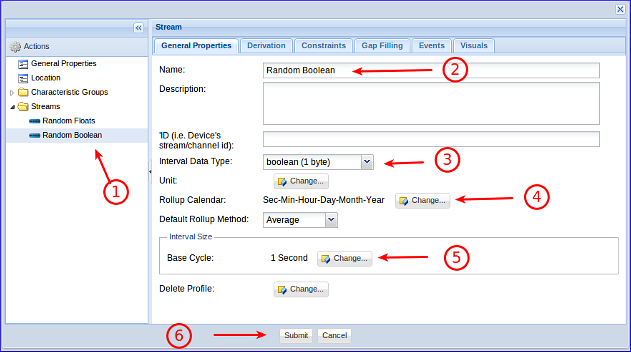
1. Create a 2nd stream. Right click on Streams and create a new Interval Stream
2. Give it a name. It can be any name
3. Set its Interval Data Type to boolean
4. Set the rollup calendar to the one we created above
5. Select 1 Second as the base cycle
6. Click Save to save the component template to the server
Important! The feeder code below does not include any stream identifiers in the feed JSON. This will cause the server to assume the order of the streams being uploaded in the JSON body is in the same order that they are defined in the component definition. Make sure your streams are in the same order as in the screen image above.
Step 4: Expand the API Key Rights
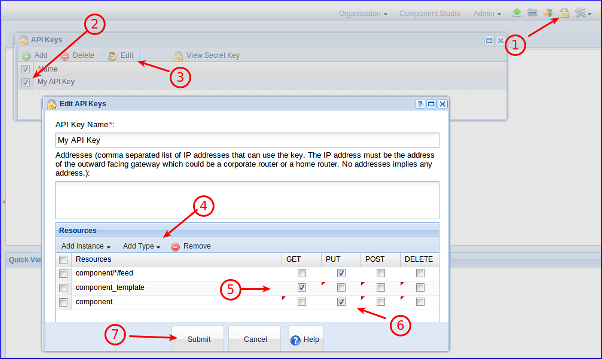
1. Click the API Keys button to edit your existing key
2. Select the existing key (created in the Hello World tutorial)
3. Click Edit
4. Add Resource Types: component_template and component. Select GET for component_template and PUT for component
5. Click Save to save your changes to the API Key
This API key allows for API calls to this organization to PUT feed data while using a component template to automatically create a component if it does not already exist.
Step 5: Create the Stream Feeder
The GroveStreams API is a Restful API and can be used by most programming languages. For this example we will use the Java programming language with the GroveStreams advanced Feed PUT API.
We highly recommend downloading and installing a Free Java editor such as Eclipse.
1. Download and run Eclipse
2. Create a Java Project in Eclipse
3. Create a Java class called RandomStreams and copy the code below to this new class file
4. Right click on your Java Project and choose Build Path -
Configure Build Path, click on the libraries tab, choose Add
JARs (or Add External JARs, depending on where you placed
the required libraries) and add the required library jars
Required Libraries
commons-codec-1.4.jar
commons-httpclient-3.1.jar
commons-logging-1.1.1.jar
org.json.jar
These libraries are free and can be found online at:
http://www.json.org/java/
(You'll have to build your own jar file or search for one already
built on the web).
Code (Don't forget to replace the ids in the code
below!)
						import java.io.ByteArrayOutputStream;
 import
						java.io.IOException;
 import java.util.Calendar;

						import java.util.GregorianCalendar;
 import
						java.util.Random;
 import java.util.zip.GZIPOutputStream;


 import org.apache.commons.httpclient.HttpClient;

						import org.apache.commons.httpclient.HttpStatus;
 import
						org.apache.commons.httpclient.methods.ByteArrayRequestEntity;

						import org.apache.commons.httpclient.methods.PutMethod;

						import org.apache.commons.httpclient.methods.StringRequestEntity;

						import org.json.JSONArray;
 import org.json.JSONException;

						import org.json.JSONObject;

 public class
						RandomStreams {

     // Replace api_key value below
						with the value from step 4 (Hello World Tutorial)

						private static final String api_key = "YOUR_SECRET_API_KEY_HERE";
						//Change this!!

     // Replace template_id with the
						ids you assigned in step 3
     private static final String
						component_id = "myOrg.myRandomComponent";
     private
						static final String template_id = "myOrg.template1";


						    private static final boolean compress = true;


						    public static void main(String[] args) {

						PutMethod putMethod = null;

         try {


						            // Connect to GroveStreams

						HttpClient httpClient = new HttpClient();


						    String url =
						String.format("http://grovestreams.com.com/api/feed?api_key=%s",
						api_key);

             while (true) {

						            putMethod = new PutMethod(url);


						        putMethod.setRequestHeader("Accept", "application/json");

						                putMethod.setRequestHeader("Content-type",
						"application/json");

                 // Create JSON

						                JSONObject jobj = new JSONObject();

						        JSONObject jfeed = new JSONObject();

						    JSONObject jcomp = new JSONObject();

						JSONArray jcomps = new JSONArray();

						JSONObject jstreamFloat = new JSONObject();

						JSONObject jstreamBoolean = new JSONObject();

						    JSONArray jstreams = new JSONArray();

						JSONArray jdataFloat = new JSONArray();

						JSONArray jdataBoolean = new JSONArray();


						        // Associate feed with a component (if the component
						doesn't
                 // exist it will automatically be
						created from the template)

						jcomp.put("componentTemplateId", templateId);

						    jcomp.put("componentId", component_id);


						        // If the component is created from the template, then
						give the
                 // new component some defaults

						                JSONObject jCompDefaults = new JSONObject();

						                jCompDefaults.put("name", "My Random Component");

						                JSONObject jcompLoc = new JSONObject();

						            jcompLoc.put("description", "Some location");

						                jcompLoc.put("latitude", 10);

						    jcompLoc.put("longitude", 10);

						jCompDefaults.put("location", jcompLoc);

						jcomp.put("defaults", jCompDefaults);


						    Calendar cal = new GregorianCalendar();

						long startDate = cal.getTimeInMillis();


						    Random rand = new Random();
                 for (int i
						= 0; i < 10; i++) {

						jdataFloat.put(rand.nextFloat() * 10.0f); // random number (0-10)

						                    jdataBoolean.put(rand.nextBoolean()); //
						random boolean

                     // Sleep 1
						second - we're doing 1 second samples and uploading them every 10
						seconds
                     Thread.sleep(1000);

						            }


						jstreamFloat.put("data", jdataFloat);

						jstreamBoolean.put("data", jdataBoolean);


						        // Since we are not setting a stream uid or id, the order
						of the
                 // streams must match the component
						or template stream order

						jstreams.put(jstreamFloat);

						jstreams.put(jstreamBoolean);


						jcomp.put("stream", jstreams);

						jcomp.put("startDate", startDate);


						jcomps.put(jcomp);
                 jfeed.put("component",
						jcomps);
                 jobj.put("feed", jfeed);


						                String body = jobj.toString();


						            try {


						        if (compress) {

						putMethod.setRequestHeader("Content-Encoding", "gzip");


                         //Compress
						body
                         byte[] compressed =
						compress(body.getBytes());

						putMethod.setRequestEntity(new ByteArrayRequestEntity(compressed,
						null));

                     }
						else {
                         // Upload feed

						                    putMethod.setRequestEntity(new
						StringRequestEntity(body, null, null));

						}

                 } catch (Exception e) {

						                    System.out.println(e.getMessage());

						            }

                 int statusCode =
						httpClient.executeMethod(putMethod);
                 if
						(statusCode != HttpStatus.SC_OK) {

						System.out.println("Upload to grovestreams.com failure: " +
						putMethod.getStatusLine().toString());
                 }
						else {
                     System.out.println("Upload to
						grovestreams.com succeeded");
                 }


						            }

         } catch (IOException e) {

						            System.out.println(e.getMessage());
         }
						catch (InterruptedException e) {

						System.out.println(e.getMessage());
         } catch
						(JSONException e) {

						System.out.println(e.getMessage());
         } finally {

						            // Release the connection
             if
						(putMethod != null) {

						putMethod.releaseConnection();
             }

						}
     }

     public static byte[]
						compress(byte[] content){
         ByteArrayOutputStream
						byteArrayOutputStream = new ByteArrayOutputStream();

						        try{
             GZIPOutputStream gzipOutputStream
						= new GZIPOutputStream(byteArrayOutputStream);

						gzipOutputStream.write(content);

						gzipOutputStream.close();
         } catch(IOException e){

						            throw new RuntimeException(e);
         }

						        System.out.printf("Compressed to %f%% of original size of
						(%d bytes)\n", (100.0f *
						byteArrayOutputStream.size()/content.length), content.length);

						        return byteArrayOutputStream.toByteArray();
     }

						}
Step 6: Run your stream feeder
The easiest way to run your feeder is to run it from within Eclipse.
Right click your RandomStreams class and and choose Debug As - Java Application
Step 7: See your results
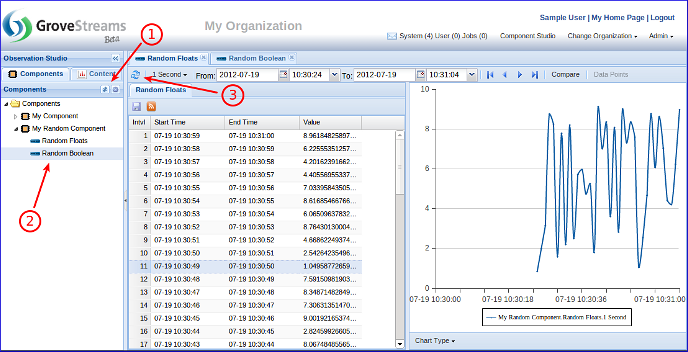
1. Components created automatically from feed uploads are placed in the Components root folder. Select the root folder and click the refresh button. Your new component should appear
2. Expand your component and double click the streams to open stream views
3. Click the Refresh button to display the latest stream intervals
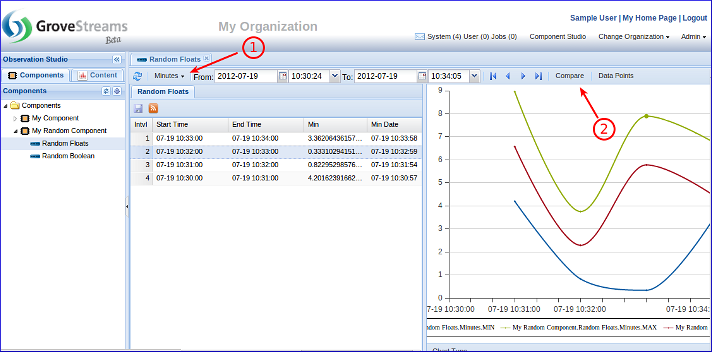
1. Since we associated a rollup calendar with each stream, rollup cycles are available for viewing and analysis. click on the cycle selection menu and choose the cycle statistics you wish to view and graph
2. Click the Compare button to compare this stream with others or drag and drop a similar stream onto the stream viewer.
3. Click the Data Points button to choose which statistics to view and graph
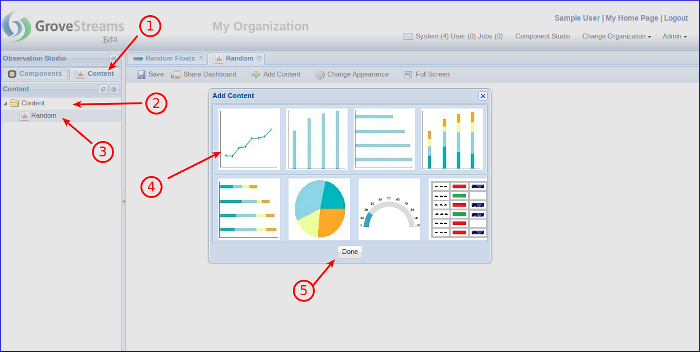
1. Select Dashboards tab
2. Right click Content folder and choose New - Dashboard
3. Give your dashboard a name, click OK, click Add Content button
4. Select the line graph widget
5. Click Done
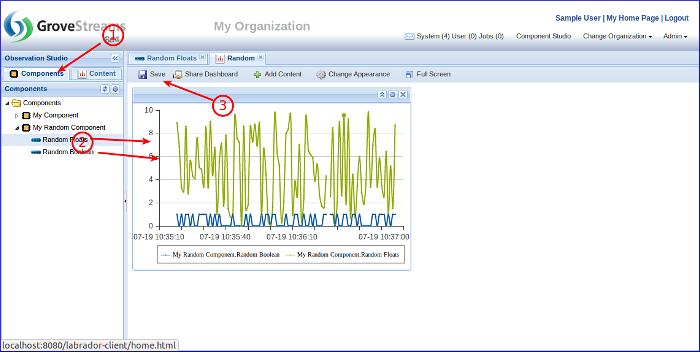
1. While the dashboard is open, click the Components tab
2. Drag each stream onto the line graph widget
3. Click Save to save the dashboard
1 second stream data should appear in the graph and update automatically. Note that boolean streams will be graphed as ones or zeros (one for true, zero for false). You can click on the cog icon in the upper right of the widget to edit the widget settings.
Congratulations! You have created your first feeder that uses templates!
